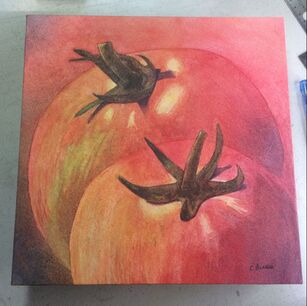
 "T'as ma toast", waxed watercolor paper on wood cradle board, 10x10x1 "T'as ma toast", waxed watercolor paper on wood cradle board, 10x10x1 A few weeks ago, I had an idea for a painting. I needed one that would fit in with the theme of the upcoming art show, which is “À table”, which can be loosely translated as “Let’s eat”. When trying to figure out I could use this theme, I had this vision of a couple of tomatoes seen from up close. I also wanted to get back into poured watercolor, so this project could serve both purposes.
I did a few pencil drawings (thanks to the composition course I recently took) to work out the composition and settled on one. I enjoyed painting it, using only three primary colors and masking fluid, applying each in many layers to achieve the desired forms and colors. It’s a long process, but it’s great to see the painting slowly appear. I described the watercolor pouring process in more detail in this past blog entry. If you are wondering about the painting's title, it is a tribute of sorts to a french "kid joke" my daughters liked when they were young. About a tomato, a potato and an onion. It isn't very funny, and can't really be translated, but the humor resides in the fact that the words in it kind of sound like the English word for tomatoes, potatoes. and onions.... yeah... kids! Because of its more abstract nature, I wanted to frame this painting in a modern way, finishing it with wax rather than the more traditional frame and glass. So I had planned to adhere the finished watercolor to a cradled wooden panel (10x10x1), wrapping the edges of the painting around the cradle, as you often see with gallery canvas in oils or acrylics. I had adhered watercolors to panels before, but had never tried wrapping the edges. Indeed most waxed watercolors I have seen, and all those I have done, are trimmed along the edges of the board after they are adhered, but I had never seen a wrapped one. I of course searched Youtube to find tips on doing this, but found no examples of what I wanted. There were instructions for wrapping a sheet of watercolor paper on a canvas before painting, but my painting was done at this point! I asked the members of the Waxed Watercolors Facebook group, but no one had tried this. That began to worry me, as I assumed there had to be a good reason! The main concern I had was that the paper would break along the folds, as it is relatively thick, and is, of course, just paper! I did a few tests with some scrap watercolor paper and found that scoring the back of the paper, like when you want to make a neat crease when making a card, was just the ticket! It gave a very neat fold, and relieved the stress on the paper so it would not crack. It took a bit of time and a few items borrowed from my husband’s workbench, as well as a bit of planning, but I did it, and I am very happy with the results! I hope you agree! But, and there’s always a but, when I checked the website for the show to get the entry deadline, I was extremely disappointed to see that the pieces entered had to be at least 150 square inches! This one, at 10inx10in, was sadly too small for the show! I don’t know if this requirement had always been there, but I obviously hadn’t noticed it! So now I have a very nice painting, specific to a theme, which I can’t put in the themed show! Thankfully, this is the same show in which I have a solo wall, with MY rules and MY requirements! So it will be in the show! Now I just have to paint something else for the main show. I have 10 days, and an idea....
0 Comments
Your comment will be posted after it is approved.
Leave a Reply. |
AuthorMy name is Claire Bureau. Archives
March 2023
Categories
All
|
 RSS Feed
