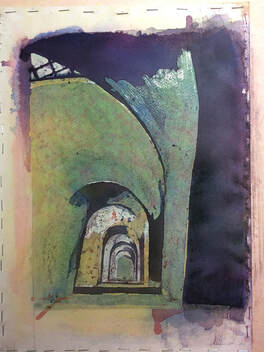
 Watercolor pouring work in progress Watercolor pouring work in progress A few weeks ago, I got a request from one of my cousins to paint a watercolor from a photograph he had taken. It is a beautiful photo, (of course!) but it has a glowing sun peeking through trees and giving the whole scene a special look. My first reaction was “Wow!”, followed immediately by “Hmmmm, how can I do that in watercolor?” and, seconds later, “CAN I do that in watercolor?”
I posted part of the photo and asked the question in one of my global networking groups on Facebook. Several people reassured me it could be done, but did not elaborate on how! Some had good suggestions, but one in particular recommended I look up the artist Roland Roycraft for tips and techniques. This artist is no longer living so there were unfortunately no Youtube videos to go to, but he did write a few books on the subject of painting light, so I bought one, used of course! And so began my journey into the world of poured watercolor. I had never heard of poured watercolors, so I was very intrigued. I found a few very useful demos on Youtube, and in particular, a multi-part series by an artist called Linda Smith Latimer that covered everything you need to know, including how to make a special board to which to attach your watercolor paper. I had to order the materials to make them, and I am glad I did! I will be making several and even if I don’t pursue pouring watercolors, I will continue to use the boards! One of the things I did not like about her methods is the amount of paint she wastes. She really takes the “pouring” part seriously, and pours most of the paint down the sink! In addition to being bad for the environment, that can be costly!! And if you have been reading me for a while, you know that I am notoriously thrifty! So I modified her technique and rather than pour the paint from a saucer like she does, I use a set of 3 squeeze bottles that I got at the dollar store. Oh, that’s right, I never did explain how the technique works! Here goes! First, you make your drawing on the watercolor paper, either before or after it has been “stretched” and attached to the painting board (like Linda Smith Latimer, I use staples). Well, actually, before that you need to decide what you will be painting. This technique works best for large shapes and images that have strong value contrasts (some very light areas, some medium, and some very dark). Then, you decide (or observe if you are using a photograph) which areas are the very lightest. If you want those to be pure white, you cover them with masking fluid, which is a liquid rubber-like substance that shields the paper from the paint (this will later be removed to reveal the white area that was masked). Then you wet the paper all over and start pouring the paint. The strange thing here is that you use only three colors: a yellow, a blue, and a red! I imagine that you can do what you want but, from my research, that seems to be how pouring works! Of course, if you remember your primary school “color theory” lessons, you know that all colors can be made from these 3 primaries. So that is where the fun begins, trying to mix the colors while pouring. Roland Roycraft says to pour each color individually and let it dry, but Linda pours each in turn while everything is still wet. I have combined the two techniques in my experimentation so far. I apply small quantities of the required colors in spots then tilt the board this way and that to mix them. Once the paper is dry again, you then proceed to mask the next lightest areas of the painting. Once the masking fluid is dry, you can then pour the next layer of color. You may try to apply the colors so that they match the objects in your painting, but the main thing to match is value (lightness or darkness). Once this layer is dry, you apply masking fluid to the next lightest parts of the painting and repeat the mask, pour routine as many times as is needed to get the darkest parts of the painting dark enough. Once it is all dry again, you remove the masking fluid, which by now covers most of the painting, and reveal what you hope are the medium and light areas in the right places! It is a bit stressful, especially as the masking fluid sometimes rips the surface of the painting, which you do not want, as the damaged paper can not easily be repainted! You can then retouch areas that you want darker, and if necessary soften hard edges left by the masking process. It is a very interesting technique for me, because part of the result is based on luck, and part is based on skill and precision. One could think that because paintbrushes are only used at the end and only if necessary, this is easier than painting! After all, I am just pouring (or squeezing in my case) the paint! The painting paints itself! But applying the masking fluid has to be done carefully and precisely, and the paints have to be applied in the right spots, which both appeal to my need for control, but the mixing of the paint is partly due to luck, which I find feeds my need to paint in a looser style. And I love the results! I may just have found the perfect technique for me! So thank you to my cousin whose request pushed me to explore something new, thank you to the people who suggested I look up Roland Roycraft, and thank you to Linda Smith Latimer for sharing her knowledge on Youtube!
0 Comments
Your comment will be posted after it is approved.
Leave a Reply. |
AuthorMy name is Claire Bureau. Archives
March 2023
Categories
All
|
 RSS Feed
